
Drip campaigns (aka email sequences) are a powerful way to re-engage users using a linear fashion. Many email marketers use this technique…
We've seen how helpful a Table of Content can be when your google sheet has many different tabs in it, but as we saw in the basic TOC guide, it can get pretty painful if you have to manually create one each time. In this guide, we're going to learn how to dynamically generate a new table of contents through a script. If you're ready, let's begin!
We're going to be using the script editor for this. If you aren't familiar with the script editor, feel free to check out our guide on checkbox automation before moving on. Otherwise, go ahead and open it up by going to "Tools" and selecting "Script editor".
Replace the placeholder function with a new one, let's call it generateTableOfContents(). For most scripting you'll do for a google sheet, you'll need to declare the spreadsheet that you're using. Since the script editor is Google Apps Script, we can use all of the built-in libraries. Here's what your code should look like:
function generateTableOfContents() {
    var spreadsheet = SpreadsheetApp.getActiveSpreadsheet();
}
To retrieve the sheets within the spreadsheet, we'll use a function called getSheets(). Once we have that, we'll need to iterate through each one to get the sheet's name. We'll also want to store those names somewhere, so we'll create an empty array and call it sheet_names.
function generateTableOfContents() {
    var spreadsheet = SpreadsheetApp.getActiveSpreadsheet();
    var sheets = spreadsheet.getSheets();

    var sheet_names = []
    for (i=0; i < sheets.length; i++){
        sheet_names.push([sheets[i].getName()]);
    }
}
So here, we're using a for loop to iterate through the sheet objects we obtained through the getSheets() function. You don't have to use a for loop, it's just my go to when I'm writing new code from scratch. Feel free to use whichever loop method you prefer here since there won't be much of an impact between the different types.
Now that you have your sheet names collected, it's time to create the hyperlinks that you'll need for your table of contents. To check on what your sheet names are, place a console.log(sheet_names) right after the loop's closing curly bracket } and then run it.
To create the links that will take your user to each specific sheet/tab, we'll be generating a =HYPERLINK() formula and populating it with the URL and text/label to display. Every google sheet URL starts off with "docs.google.com/spradsheets/d/", followed with the Spreadsheet ID, and then a "/edit". If you have multiple tabs, you'll notice that there is also a "gid" attached to the end of the URL - that's your Sheet ID. Just like how we got the sheet names earlier, we'll being doing the same to get the sheet IDs.
First thing is to get your spreadsheet's ID. The easiest way is to copy the URL and pull it out from there. Since we're writing the code to do this, we're going to make it more easily reusable for your other spreasdheets. To do that, we'll be using the getId() function which is available on the spreadsheet level. Let's create a new variable called "url" and set it equal to what your typical google sheet URL would look like.
var url = 'https://docs.google.com/spreadsheets/d/' + spreadsheet.getId() + '/edit'
Place that variable right after where we used getSheets() and above where we looped through those sheets. We'll be using this url variable within our loop so that we can add the hyperlink to the array which held our sheet names.
Once you have your url set up, go into your array and add in a new variable called "sheet_url". We're going to url and concat it with the "#gid" parameter (which helps identify a specific sheet) and pull out the sheet's id using the getSheetId() function which is available at a sheet level. Your code should look like this after:
function generateTableOfContents() {
  ...
  var sheets = spreadsheet.getSheets();
  var url = 'https://docs.google.com/spreadsheets/d/' + spreadsheet.getId() + '/edit'

  var sheet_names = []
  for (i=0; i<sheets.length; i++){
    var sheet_url = url + '#gid=' + sheets[i].getSheetId();
    sheet_names.push([sheets[i].getName()]);
  }
}
Now that you have the sheet url set up, it's time to put it together with the =HYPERLINK() formula. This formula takes in a URL and a Label. When doing this in code, make sure that you're using the proper quotes. Google sheet formulas require double quotes, so you'll need to use single quotes for any strings in your actual code. Your hyperlink variable should end up looking like this:
var hyperlink = '=HYPERLINK("' + sheet_url + '", "Go to tab")'
While we're at it, let's clean up our code a bit by declaring a variable for the sheet_name and using it in our Array.push(). Your loop should look like this afterwards:
...
  for (i=0; i<sheets.length; i++){
    var sheet_name = sheets[i].getName();
    var sheet_url = url + '#gid=' + sheets[i].getSheetId();
    var hyperlink = '=HYPERLINK("' + sheet_url + '", "Go to tab")'
    sheet_names.push([sheet_name, hyperlink]);
  }
...
This will make the sheet_names array into a nested array where each position has an array within it. The data set will basically look like this after it runs:
[
    ["sheet name 1", "hyperlink 1"],
    ["sheet name 2", "hyperlink 2"],
    ["sheet name 3", "hyperlink 3"]
]
That takes care of the hyperlinks. You now have the sheet names and the links for each sheet that you'll need for the table of contents. The next step is to insert it into your TOC sheet/tab.
To insert data into a spreadsheet, we'll first have to determine where to place the data. If you don't already have a TOC sheet, go ahead and create one. We're going to place our newly generate sheet names and links into cell A1 of that sheet/tab.
Going back to the script editor, we're going to point the code at that sheet by using the getSheetByName() function.
var destination_sheet = spreadsheet.getSheetByName("TOC")
Then we'll need to point the code at cell A1, which we can do with the getRange() function. In this function, we'll be passing through 4 parameters - row start, column start, number of rows, and number of columns. Since we want it to start at A1, we'll set the first two parameters equal to 1. Then the number of rows will depend on how much data we have in our "sheet_names" array, and the number of columns wil be how many values we have in the nested array (which should be 2 - one for the sheet name and another for the hyperlink).
var destination_range = destination_sheet.getRange( 1, 1, sheet_names.length, sheet_names[0].length)
Notice that for the number of columns, we're saying sheet_names[0].length - this basically means that we're looking at just one of the positions of the sheet_names array, the first position in this case (since arrays start at 0), and counting the number of values within that part. The visualization from earlier is a great depiction of what this looks like and how it works.
To insert what we generated for sheet_names, we just need to call setValues() on the destination_range. Like so:
destination_range.setValues(sheet_names);
You'll want to place all of this new code at the end of our generateTableOfContents() function, after the loop. Once you put it together, it should look like this:
function generateTableOfContents() {
  var spreadsheet = SpreadsheetApp.getActiveSpreadsheet();
  var sheets = spreadsheet.getSheets();
  var url = 'https://docs.google.com/spreadsheets/d/' + spreadsheet.getId() + '/edit'

  var sheet_names = []
  for (i=0; i < sheets.length; i++){
    var sheet_name = sheets[i].getName();
    var sheet_url = url + '#gid=' + sheets[i].getSheetId();
    var hyperlink = '=HYPERLINK("' + sheet_url + '", "Go to tab")'
    sheet_names.push([sheet_name, hyperlink]);
  }

  var destination_sheet = spreadsheet.getSheetByName("TOC")
  var destination_range = destination_sheet.getRange(1, 1, sheet_names.length, sheet_names[0].length)
  destination_range.setValues(sheet_names);
}
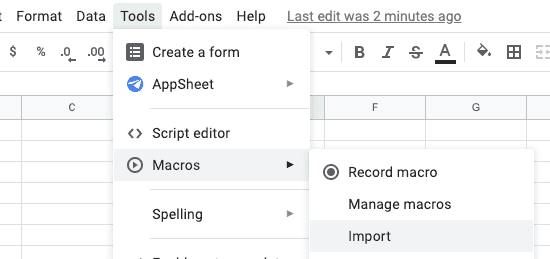
To use our function as a macro, we'll need to import it into the tools bar. To do this, click on the "Tools" option in your menu bar, open up the "Macros" option, and then select "Import" from the options list.
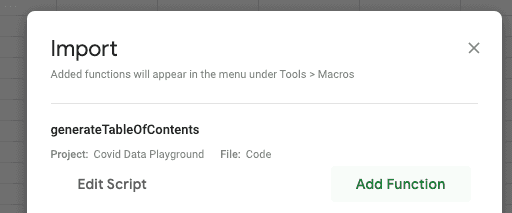
When the modal opens up, you'll see your function as an option. Click on the "Add Function" button to import it. You'll see the button turn into a checkmark when it's done.
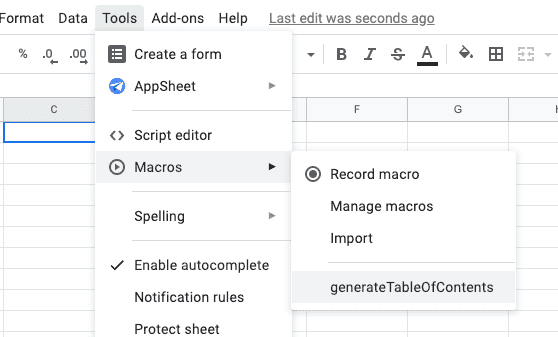
Close out of the modal and then open up your Macros list again - you'll see the function we just added as an option. Clicking on it from here will immediately run the code. You'll know that it's running when a little banner alert pops up saying "Running Script" and it'll update to say "Finished Script" once its done.
A more interactive way to run the code is by insert an image and assigning the function to it. This method is more user friendly since you're placing the button onto the sheet and letting people click on it instead of going into the menu bar.
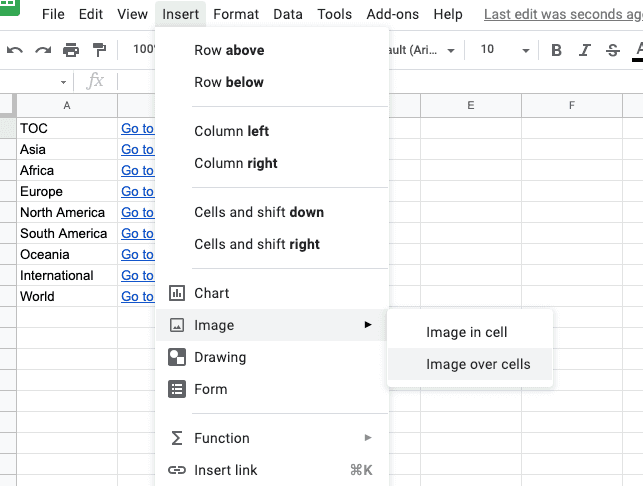
To insert an image, click on the "Insert" option in the menu bar, hover over the "Image" option, and then select "Image over cells". Make sure that you are selecting the "Image over cells" option. If you select "Image in cell", you won't be able to assign a script to it.
If you have an image in mind, go ahead and select it. If not, let's just find a refresh icon from a Google Search. The image insert modal will have that as an option if you click on the "Google Image Search" tab within the modal
![]()
Once you have the image inserted, click on it to select it, and find the 3 dots in the upper right of the image. When you click on those dots, a menu should appear which will give you the option to "Assign script"
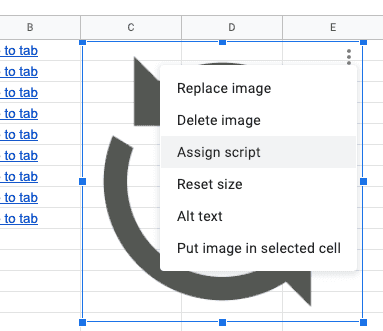
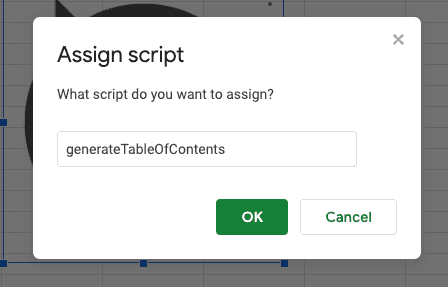
In the modal that opens up, just put in the name of the function you want to run whenever someone clicks on this image. In out case, it'll be "generateTableOfContents".
Now that it is all set up, the script will run whenever someone clicks on the image. To bring up the 3 dots again or to resize the image, right-click on the image and then you'll see the options.
After some resizing of the image, some repositioning, and add in some text as instructions, you can make it really intuitive for anyone to use. I put my button next to the list and put instructions to the right of it. Here's how mine looks:
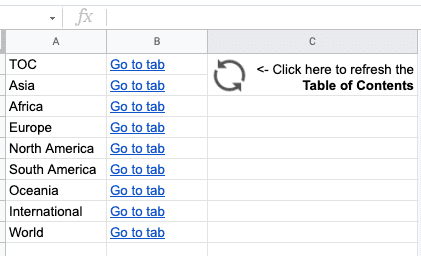
Now you have an easy way to generate and update a Table of Contents for any spreadsheet you want. All you'll need is your generateTableOfContents() code, and a TOC sheet/tab created in whichever spreadsheet you want to add this to. In our next guide around the table of contents, we'll dive into completely automating the experience so that no manual clicks are needed to keep it up to date.