

Drip campaigns (aka email sequences) are a powerful way to re-engage users using a linear fashion. Many email marketers use this technique…
In this guide, we're going to create an automated way to update the tasks through the Todo list we created in our guide to creating custom todo lists for individual team members. The way we're going to solve for it is by using an onEdit(e) trigger that is made available to us through the Google Sheet's Script Editor. To complete this guide, you'll need to have a little bit of javascript knowledge.
The Google Sheets Script Editor is actually another product from Google which they call Google Apps Script. This online editor is very powerful and will do just about everything you'll need it to outside of building your own application. Since this is a Google product, there are already pre-built libraries that we can use to help build automated processes into various Google products. In this guide, we'll be using it to manipulate our Google Sheet that holds our Task Management Tool.
For more information, please visit the official Google Apps Script website.
First thing is to open up the editor. In your Tasks Management Google Sheet, click on the "Tools" option in your menu bar and select the "Script editor" option.

This will open up a separate tab in your browser with a new Google Apps Script project. Since you're creating this project through a Google Sheet. It'll automatically be connected with your Task Management Google Sheet. It'll looking something like this:

Feel free to change the name of the project to "Task Management Backend" so that you can easily find it again later.
The editor is made up of a few different parts. The editor itself is where most of our time will be spent. The main text area is where we'll be writing our functions and the action icons on top of them is how we'll test our functions as we're building this out. We'll only focus on the "Run" action and the "Functions List" (which should say "No functions" for now)

On the left-hand side, you'll see fix options. Hover your cursor on the icons to expand the tray so you can read the labels. We'll be focusing on the Editor and the Execution in this guide. The Editor is what we'll be working in and the Executions is where we'll see a log each function we run.

Before we start putting in some functions, we have to update our Google Sheet with a couple of new things first.
Our goal is to make it so that we can set a task as "Done" without having to leave the Todo list. There's a few ways to do this, but we're going to use an "Checkbox" to help us mark things as done. Once that box is checked off, we'll have it trigger a function that will find the record on the "Tasks" tab and then update the status to "Done".
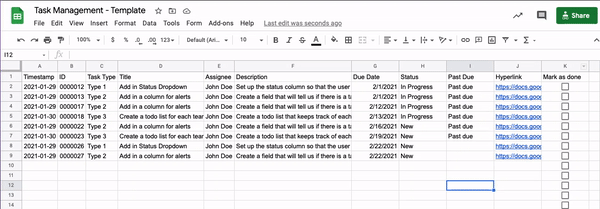
Before we add in the Checkbox, let's go to the "Tasks" tab and add in a new column for an ID. This ID is how we're going to let our function find the correct row to update later. To Start, add insert a new column to the right of Column A. You can do this by hightlighting the entire column (by click on the Column Letter), right-clicking, and selecting the "Insert 1 right" option.

Once your new column is in, enter in "ID" as the value for B1 and then put this formula into B2: =SEQUENCE(count(A:A),1,1,1). This formula will automatically populate every row with a number in sequential order. Since it is using Column A as a reference to display the sequential number, we'll always have a ID for any new entries through our connected Google Form.

Your values probably look like "1, 2, 3, 4, 5.." instead of what's in the screenshot. That's okay. I'm a fan of having leading zeros when it comes to IDs. To do the same, you just have to change the number format. You can do this by clicking on the "123" option in your menu bar and creating a custom format. For leading zeros, the format is "0000000". You can make it how ever many zeros you want - I did 7 because 7 sounded like a good number to me.

NOTE
Since we added in a new column, you'll have to update the =QUERY() formulas we made in the previous parts. The update is easy though, you just need to change the where statement of the query so that the columns match up again. Instead of D = 'John Doe', do E = 'John Doe', G <> 'Done' becomes H <> 'Done', and your order by will also just shift a letter over.
To add in a checkbox into the sheet, we'll be diving into the "Data Validation" option again. If you updated your query formulas, the next free column in your Todo tabs should be Column K. In K1, set the value to "Mark as done". Then open up the data validation menu:

Select "Checkbox" from the dropdown menu for "Criteria" and make sure that the cell range for the sheet is K2:K so that it covers all of the rows in the todo list.

Once you're done, it should look like this:

That's all the set up we'll need in the spreadsheet. It's time to go back to our script editor.
To make it so that we can check off the box in our "Todo" tabs and have it mark the task as Done in the "Tasks" tab, we're going to use 4 functions in total.
The onEdit(e) function is a Google Apps Script simple trigger which will execute whenever there is a change made in the spreadsheet. The markAsDone() function is going to be where we write the majority of our logic. The other two functions are helper functions that we'll use to locate the right row to update in the "Tasks" tab. Let's start with those 2.
The first step is to declare our function.
function getColumnByName(column_name, header_row) {
    // Code
}
Notice how we're going to be passing in a column_name and also a header_row. The column_name will be the text we want to search for and the header_row is what we'll use to determine which row has our column headers. In our case, it's always going to be 1 but it's good to get into the habit of being more flexible than always needing the header row to be the first row in the tab.
The first line for this function will be to set up a sheet variable:
var sheet = SpreadsheetApp.getActiveSheet();
SpreadsheetApp is a built-in library providated by Google which gives us a vast number of different pre-built functions we can take to modify our spreadsheet. The getActiveSheet() function will make it so that our script knows which tab in our spreadsheet to work with. The next step is to find the data in that tab and then find out which position the column named 'Mark as done' is.
var data = sheet.getDataRange().getValues();
The getDataRange() function will give us the object which holds everything for the tab and then the getValues() function translate the object to just the values, allowing us to read it. This data will come to us as an Array grid.
For example, the array [[1,2,3],[4,5,6],[7,8,9]] will look like this when you look at it in the spreadsheet:
| 1 | 2 | 3 |
| 4 | 5 | 6 |
| 7 | 8 | 9 |
We only care about the first row, so we'll be looking at data[0]. Since we're passing in a "header_row" to be flexible, we'll take that and subtract 1 since array positions start from 0 unlike the spreadsheet's rows which start from 1. We'll also have to add 1 to the returned result so that we match things back up to how we expect it on the spreadsheet
var col_index = data[header_row-1].indexOf(column_name);
return col_index+1
The indexOf() function is another pre-built function which lets us pass through text for the system to match up. It'll return a number back to us which we'll use to verify that the "Mark as done" column was what triggered the onEdit(e) funciton. Your getColumnByName() function should look like this now:
function getColumnByName(column_name, header_row) {
  var sheet = SpreadsheetApp.getActiveSheet();
  var data = sheet.getDataRange().getValues();
  var col_index = data[header_row-1].indexOf(column_name);
  return col_index+1
}
Similar to the getColumnByName() function, lets start off by declaring our getRowById() function:
function getRowById(id) {
    // Code
}
Notice here that we're passing through id as a parameter. This is the same "ID" that we made earlier using the =SEQUENCE() formula.
Instead of setting the current sheet as the active sheet, we're going to have the script set another tab as the active sheet by using the getSheetByName() function.
var sheet = SpreadsheetApp.getActiveSpreadsheet().getSheetByName('Tasks');
This will make it so that our script is focused on our "Tasks" tab when we read the data using the same function from earlier:
var data = sheet.getDataRange().getValues();
It gets a tad bit tricker here since we're not looking for a matching column, but rather a matching row. Since the Array grid we get is based on rows and not columns, we'll have to loop through each position in the Array and then each position in each nested array to find what we want. To do this, we're going to use a "for loop" with a "nested for loop":
for(i=0; i < data.length; i++) {
    for(y=0; y < data[i].length; y++){
        if (data[i][y] == id){
            var row = i+1
            return row
            break;
        }
    }
}
What this is basically doing is going to every value and seeing it it equals our ID. If it does equal the ID, then take the position and return it after adding 1 to it so it can match up with the spreadsheet's positions. The function should look like this in the end:
function getRowById(id) {
  var sheet = SpreadsheetApp.getActiveSpreadsheet().getSheetByName('Tasks');
  var data = sheet.getDataRange().getValues();
  for (i=0; i < data.length; i++) {
    for (y=0; y < data[i].length; y++){
      if(data[i][y] == id){
        var row = i+1
        return row
        break;
      }
    }
  }
}
Now that we have our two helper functions completed, it's time to work on the logic which will accomplish the automation we want. Once again, start off by declaring the function:
function markAsDone(spreadsheet, sheet, row){
    // Code
}
All 3 of the parameters you see are things that we'll pass through to the function in our onEdit(e) function based on what the user does within the Task Management Google Sheet. The first step is to find out where our "ID" column is. We'll call our getColumnByName(column_name, header_row) function to find it:
var id_col_index = getColumnByName('ID',1);
If you set up the Task Management spreadsheet in the same way, id_col_index should end up being "2" here.
The next step is to get the actual ID for the row that was updated. To do that, we'll be using the getRange() function which takes in the paramters (row, column). the row is something we'll get from the paramters being passed through into our function and the column is the id_col_index we just calculated.
var id = sheet.getRange(row, id_col_index).getValues();
Once we have this, we can use it with our getRowById() function to get the row index back on the "Tasks" tab.
var row_index = getRowById(id)
Now that we have the matching row on the "Tasks" tab, it's time to actually go in and update the status column. To do that, we're going to use the getRange(row, column) function again, but this time we're going to use the row_index and the column index for "Status" as the paramters). We're also going to create a new variable for tasks_sheet so that we can point it at the "Tasks" tab.
var tasks_sheet = spreadsheet.getSheetByName('Tasks');
var status_col = getColumnByName('Status',1)
tasks_sheet.getRange(row_index, status_col).setValue('Done');
Notice how we're also chaining another function to the end of that called setValue(). In javascript, your lines of code can be a continous chain of commands that go up to any amount. In reality, we could have made our entire markAsDone() function one giant line of chained commands which would have ended up like this:
spreadsheet.getSheetByName('Tasks').getRange(getRowById(sheet.getRange( row, getColumnByName('ID',1)).getValues()), getColumnByName('Status',1)).setValue('Done');
It's not exactly easy to read though, so that's why we broke it all up into neat variables that can be managed better in the long run. It's also a much better way to debug any issues/errors you find. The end result should look like this:
function markAsDone(spreadsheet, sheet, row){
  var id_col_index = getColumnByName('ID',1);
  var id = sheet.getRange(row, id_col_index).getValues();
  var row_index = getRowById(id)
  var tasks_sheet = spreadsheet.getSheetByName('Tasks');
  var status_col = getColumnByName('Status',1)
  tasks_sheet.getRange(row_index, status_col).setValue('Done');
}
Now that we have our core logic all figured out within the markAsDone() function, it's time to connect it all with our onEdit(e) function. As usual, start with a declaration:
function onEdit(e) {
    // Code
}
The e parameter is going to come from the triggered event, hence the usage of e for event. There's a bunch of different variables that come with the event, but the ones we care about are source, range, and value. For the full list of variables, please check out Google's official documentation.
The first step is to assign a bunch of variables that will be useful to us when using the markAsDone() function:
var spreadsheet = e.source;
var sheet = spreadsheet.getActiveSheet();
var range = e.range;
var row = range.getRow()
var col = range.getColumn()
In theory, we don't have to do all of this but it just helps with the readability of our code. The last thing you want is to have to open up this script to fix a bug and have a panic attack because you can't read your own code.
Since onEdit(e) is a simple trigger, it will run every time that someone edits the spreadsheet. We only want to mark our tasks as done if the user checked off the box to true. To make sure that we're only executing our markAsDone() function when that happens, we're going to use an if statement:
if(sheet.getRange(1,col).getValues() == 'Mark as done' && e.value == 'TRUE') {
    // Code
}
In our if statement's criteria, we have two parts. The first one is sheet.getRange(1,col).getValues() == 'Mark as done' which is just checking for the column header to make sure that what the user changed was under our "Mark as done" column. In the second criteria, e.value == 'TRUE', we're just making sure that the user checked the box and not that they unchecked the box. It's just an added layer of security to make sure that the experience is as expected.
The next step is to to call our markAsDone() function. It's as simple as adding in this line of code:
if(sheet.getRange(1,col).getValues() == 'Mark as done' && e.value == 'TRUE') {
    markAsDone(spreadsheet, sheet, row)
}
Since we declared the spreadsheet, sheet, and row variables above and set them to the event's values, everything will just work. Before you give it a try, theres' one more line of code we need to add - range.setValue('FALSE'). If we don't add this right after the markAsDone() function, the checkbox will remain checked off for that row in the Todo tab even though our =QUERY() formula already filtered out the task we just marked as done.
Your onEdit(e) function should look like this:
function onEdit(e) {
  var spreadsheet = e.source;
  var sheet = spreadsheet.getActiveSheet();
  var range = e.range;
  var row = range.getRow()
  var col = range.getColumn()

  if(sheet.getRange(1,col).getValues() == 'Mark as done' && e.value == 'TRUE') {
    markAsDone(spreadsheet, sheet, row)
    range.setValue('FALSE')
  }
}
And here's how it should look when its in action:
If you run into any issues, be sure to use the "Executions" tab in the script editor to see what the error was. You can also use the console.log() function to get more information into where things are going wrong. For example: if you're not getting the right column index for status, you can put in console.log(getColumnByName('Status',1)) to see what's going on.
Your executions tabs will look something like this:

If you've made it this far, you're already way ahead of the curve now. This type of automation by itself is sure to impress your colleagues and help streamline your operations. You can also apply what you learned here to other types of automation - like sending emails out using data from a spreadsheet or auto-assigning tasks to different team members as new tasks get created by the Google Form. Speaking of which, Auto-assignments will be the next guide in this Task Management series. Stay tuned!
Drip campaigns (aka email sequences) are a powerful way to re-engage users using a linear fashion. Many email marketers use this technique…

